One of the first decisions you have to make when planning your plot is whether you’re going to go for a traditional veg patch – a big block of soil with plants in rows – or investing in raised beds. There are advantages and disadvantages on both sides, and ultimately how you choose to lay out your plot will depend on your personal circumstances.
Pros and Cons
A big advantage of raised beds is that – if they are built properly – you never have to step on the soil. If you avoid stepping on the soil, you avoid all of the problems that soil compaction brings, and your soil structure will be an ideal environment for plant roots. You can follow a ‘No Dig’ regime, adding soil amendments like compost to the surface of the bed, and letting worms and other soil organisms do all of the hard work of soil improvement for you.
Raised beds also concentrate the effort and inputs your vegetable patch needs. You’re not watering, fertilizing or weeding the bits where plants aren’t growing. Plants love the deeper root zone available to them, and you can plant them closer together, which means you get a higher yield out of the same horizontal space. The soil heats up quickly in raised beds with a little spring sunshine and if you build them at least 18 inches off the ground, they can help to stop some pests such as the carrot fly.
If you have problems with the soil, then raised beds can be the answer. If soil is too contaminated to grow crops, then putting a raised bed on top (with a suitable non-permeable barrier underneath) allows you to use the space for a garden. A raised bed on top of weed control fabric effortlessly deals with perennial weeds which is often a problem on new allotments.
Raised beds are ideal for people who have problems bending down to the soil – you can build them up as high as you need to, for example raised beds can be wheelchair accessible, with wide paths in between to allow access. If your ground isn’t level, raised beds can be a way of creating level ground for growing vegetables.
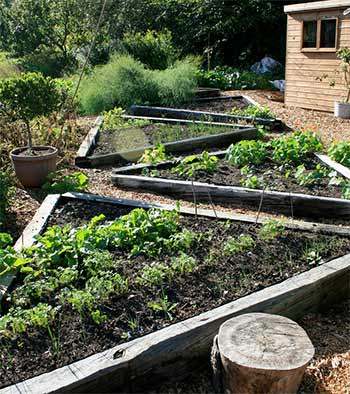
There are also some aesthetic advantages to raised beds. Properly laid out, they can lend height and structure to the garden, and they give you edges over which you can grow trailing plants.
But they’re not for everyone. For starters, there’s a lot of effort – and possibly expense – involved in setting them up. Depending on what’s used to form the sides of the bed, they can be a haven for slugs and snails, who will then come out at night to feast on your plants. And the higher you raise your beds, the more soil and organic matter you’re going to need to fill them.
Building your bed
The simplest method of making a raised bed is simply to take soil from where the paths will be, and pile it up onto the beds. The beds get higher, the paths get lower, and there’s no edging required. It doesn’t cost you a thing, and you still get many of the advantages of raised beds, but it’s not the most attractive option.
Where annual weeds are a problem, you can put a thick layer of newspaper or cardboard (wet it first) down before you start building the bed. It excludes enough light to discourage annual weeds from growing, but biodegrades over time. If there are perennial weeds that you don’t want to dig out, then a water-permeable weed fabric is a better option, as killing perennial weeds by excluding light can take several years.
If you want sides on your raised bed, then there are several different options. Timber sides are traditional, and very attractive, and you can buy ready-cut kits that are easy to put together. Soft woods rot after several years, and so aren’t the best option for a long-term garden. Hard woods can be treated with linseed oil for an environmentally-friendly protective layer; pressure-treated timber isn’t a good choice if you’re an organic gardener, as it can cause some soil contamination. Railway sleepers were popular a few years ago, but again used ones can cause pollution problems, and they are extremely heavy and hard to cut through.
Plastic kits are easy, and relatively cheap, although most of them lend themselves to smaller beds. If you’re handy then you could build your own with stones, bricks, or concrete blocks, but you do need to level the site properly first. Bricks and stone walls are less attractive to slugs and snails as they are rough, and they also retain heat, which gives your plants a boost when the weather is a little on the chilly side.
Filling your raised beds
The obvious choice for filling the bed is garden soil, and if you have some you can move from elsewhere in the garden then start with that. Then add any organic matter you can get your hands on – starting with home-made compost. Start looking around for local and cheap sources of organic matter, such as well-rotted horse manure from the local stables, or spent mushroom compost.
You don’t have to fill the entire bed all at once, so if you’re falling short on compost there’s no need to panic. Keep on composting and collecting materials, and you can add layers whenever you have enough. You can also add organic mulches like grass clippings, fallen leaves and bark chips to the top of the beds, which adds to the compost whilst also helping to keep in moisture and prevent weeds from becoming a problem. If you have plants in containers then their spent potting compost can be added to the beds at the end of the season, adding organic matter and any remaining nutrients to the soil there.
A raised bed that contains a lot of organic matter is an ideal place to grow annual crops, as the plants will love the soil. However, if you want to plant up your bed with perennials, then a high organic matter content has one disadvantage – slump. As the organic matter rots down over time, the soil level drops, meaning that long-term plantings get lower and lower in the bed. That’s not a problem for annual crops, as you can add more compost every time you replant, but for permanent planting make sure your basic mix is soil-based, to avoid the slump.